
Buy American!
For Specific Grill Repair, Click on Your Model:
Weber Summit Silver Conversion
Making a SLG2006C Burner Bracket
Great Outdoors 1000
I bought this grill from an individual here in Little Rock a few years back. The grill was in great condition except the burner and rock grate needed replacement. This is a very solid, heavy old grill that can last a life time if you can find the valves and burners.
The original valves may last, but will likely have to be replaced within fifteen years. Great Outdoors was bought by CFM Corp out of Canada. CFM Corporation has been out of business for several years now. OEM parts will be hard to find.
The original valves may last, but will likely have to be replaced within fifteen years. Great Outdoors was bought by CFM Corp out of Canada. CFM Corporation has been out of business for several years now. OEM parts will be hard to find.
Remember!!! Be certain to check for leaks, with soapy water, any gas fittings you open and be certain of your work OR you could have a fire and injury!!!
Call a technician if you're not sure of your work.
1) I began by removing all the grids, rock and grate from the inside of the grill. The rocks can usually be removed with the grate by just holding the grate on both sides with two hands and lifting out, leaving the rocks on the grate.
Since the original burner is bolted to the bottom of the grill you'll likely have to grind, twist or drill out the bolt heads holding the burner in from the bottom of the casting. I tried to work from under the grill but found it hard to work on the bottom looking up on my knees or laying on the deck and reaching up. I decided to turn the grill upside down to remove the boltheads holding the burner.


I used an electric drill with a new 1/4 inch bit which makes short work of drilling out the heads. The burner fell to the deck with the last bolt head drilled out. The bolts are less than 3/16. With that done I was ready to right the grill and move on.
2) I inspected the castors , which were in great shape. If the factory doesn't have replacements you could easily find a suitable replacement at Home Depot or Lowe's, but you would likely have to replace all four castors. You could also remove all four castors and allow the grill to set directly on its base. Bolting the grill to the deck would be simple.

3) With the grill back in an upright position I was ready to replace the ignitor electrode/collector box. The old one was rusted badly and I thought it would have to be replaced. If you wanted to, you could simply remove the old electrode and light the grill through the hole in the right side bottom of the grill.
Many grill users I've spoken with prefer to have their ignitors working. And even after replacing the whole assembly the burner doesn't always work consistently. After almost thirty years of working on gas grills, I prefer to light with a long stemed lighter found in most stores.
I had to knock out part of the old electrode with a heavy punch, grind down the broken stub with an electric grinder, and then drill out the hole with a 3/8 inch drill bit. With that done, I was able to install an aftermarket electrode (#03800, www.clagrills.com/allgrillparts/all-repairparts.htm).
Some of the GO grills had electrode/collector boxes with two electrodes. The #03800 will work if you ground the extra wire to the grill. Otherwise you'll likely have to contact the factory for a replacement. The top of the replacement electrode box should be at the level of the top of the burner. Other grills used just one electrode box. you many need a new wire and/or igniter. CLA #03400 (connector wire with one round and one flat spade female) should connect . And, either CLA #03200 with a single outlet or CLA #03220 with 2 outlets should work. See #4, next, for more information.
Depending on which burner you use, the height of the top of the collector box will need to be adjusted with the nuts that screw on the shaft with the electrode. Ideally, the spark needs to be around 1 1/2 inches from the burner portals.
The performance changes from model to model as well as what kind of replacement part you use for the burner and electrode. The two electrode collector boxes from the factory will work better than the single, because it will give you two sparks at one time.
Do not tighten the shaft of the electrode until you have experimented with the burner in place. 


4) With the new electrode/collector box in place (but not screwed down) I can check the old ignitor, which for this grill is a very common rotary type ignitor used on many different brands. To remove it, I had to take out four screws and hold the valve cover plate on. Don't lose the screws.
The CLA part # 03220, (found with repairs parts link listed in section 3), is almost a duplicate, but doesn't have the same knob. If you can't use your old knob, know that the one supplied with # 03220 will work.
It is held on by two small screws. You might want to have the grill over a solid area while you have these small screws loose. Spread a sheet or plywood down if you have a deck as I do. I have lost several screws, but had a warehouse of parts to replace them.


5) Remember!!! If you take apart any gas fittings on the grill, including valves, be certain to check for leaks with soapy water under pressure before use. Correct any leaks or you could have the chance of fire and injury!
If you're not certain of your work call a technician!!!
To remove the valve assembly, or the knobs, I had to remove the valve cover plate which was held in by four screws. The valve assembly of the GO 1000 that I have is in good shape. So I didn't need to make any repairs.
If you have a regulator problem I've outlined your choices under the repair section of this site, "crimped hoses", and the pictures there are for the valve-hose-reg assy on this grill, the GO 1000.
This link, www.clagrills.com/allgrillparts/great_outdoors/great_outdoors-model-1000.htm, shows the parts we have including a valve manifold which can replace the "crimped" manifold found on the 1000. I also tried CLA valve #36500, which worked but not perfectly. Check www.clagrills.com/allgrillparts/all-valves.htm to see that part. The CLA #02552 knob, which is a plastic, silver knob fits the original vlave assembly.
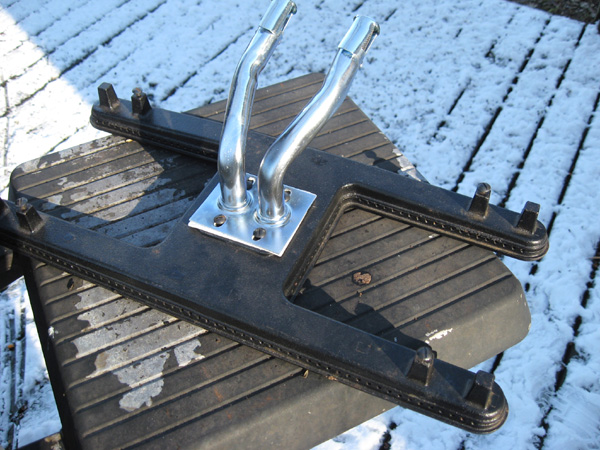
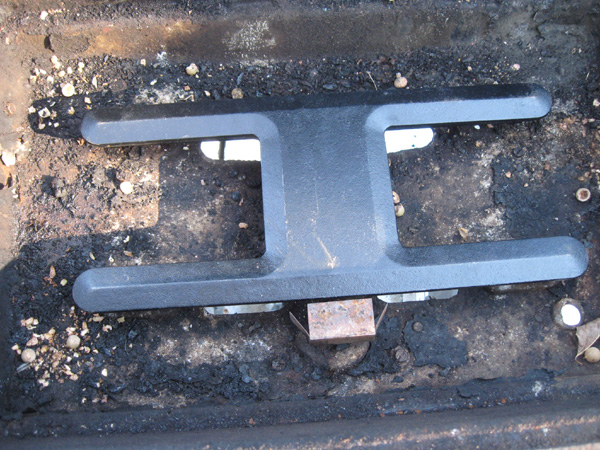
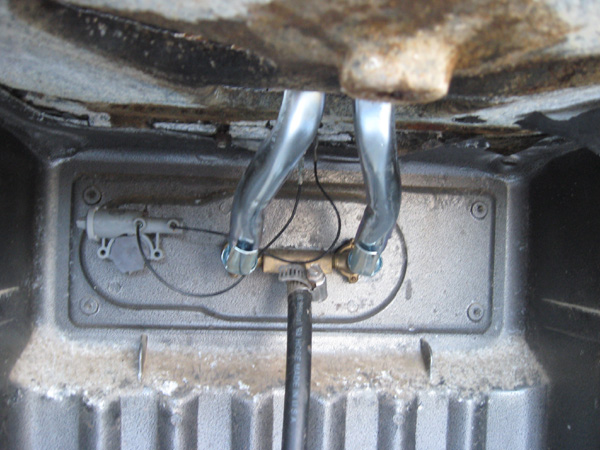
6) After I've done the previous steps, I'm ready to install the new burners. We have only one burner for this model, CLA-BI0013, seen at this link: http://www.clagrills.com/allgrillparts/great outdoors/great outdoors-model-1000.htm and the venturi CLA #75062 which is seen on the same page. None of the aftermarket stainless or cast iron work well with the 75062 venturi. I found, when replacing mine, that the valve assembly flange needed to be screwed flush against the control panel for the burner to fit well. I also found that I couldn't get all 4 screws to go into the burner feet. You only need 1 o 2 in the "feet" to secure the burner to the grill bottom.
7) I finished with a grate and Pyromid Briquettes (41651) from the CLA GO page for the 1000. This grill's grids were still good but we show grids on the same page. This is a solid old grill and can last for years.